
Blogging with students can add a lot to a college classroom. As a project-based learning tool, it can serve as a forum for applying concepts from class, practicing disciplinary-specific writing skills, and has the advantage of being a published, shareable resource that students can use on a resume, or to support professional portfolios. Whether students are creating their own unique blogs, or you have a class blog that students are adding to, blogs can help you meet a variety of teaching and learning goals. Blogging can:
- provide a forum to create and publish for an authentic (public) audience
- be a vehicle for disciplinary (or cross-disciplinary) writing
- promote dialog across student groups or larger global audiences
- create opportunities to model and apply information literacy and digital citizenship skills.
Need more convincing, check out these resources:
- Vanderbilt University’s Teaching with Blogs page
- Teaching with Technology Hub’s Student Blogging page
The following instructions will walk you, step-by-step, on how to get up in running with Blogger (a tool within Google GSuite), to get you or your students publishing content in no time!
Creating & Publishing to your Blog
Step 1: Sign up for a Blogger Account
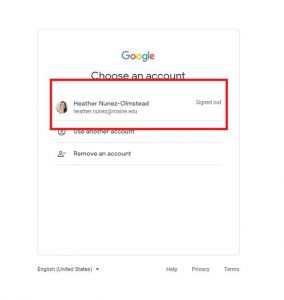
- First, visit http://blogger.com or Google “Blogger”

- Then, sign in with your @maine.edu email address
Step 2: Create a New Blog
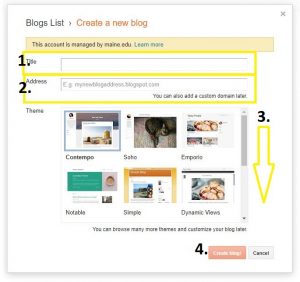
- Click the New Blog button. This should open a Create a new blog window
- Enter the title of your blog (note: you may have to try a few names to find one that is available)
- Enter the address for your blog (example: myawesomeblog.blogspot.com). Note, that unless you have your own domain, your address will have to end in .blogspot.com. For the sake of your class projects, there is no need to buy a domain.
- Scroll down to pick a template you think compliments your blog topic
- Click Create blog!
Step 3 Create a Blog Post
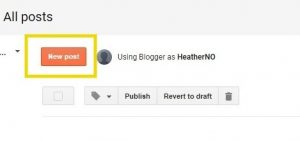
- Click the New post button to open a content editor
- Add a post title
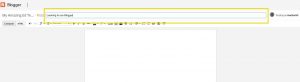
- Click into the document and enter your content. Explore the basic editing tools in the content editor to set headings, adjust font size and color, add list features, images and hyperlinks.

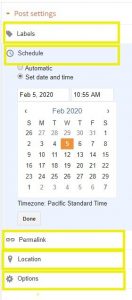
Step 4: Manage your post settings
- On the right-hand side of the screen is the Post Settings use the following options to control how and when your post is published, as well as how readers will be able to interact with it:
- Labels allows you to add labels, or keywords, that are searchable by your reader
- Schedule allows you to publish immediately, or set a time in the future to publish
- Permalink, your post URL address will auto-populate with your post title, if you wish to create a custom URL, enter that here. Save this link–this will be the link to your published blog.
- Location setting are *optional*
- Options lets you choose whether or not to allow reader comments on your post. You can also choose some HTML formatting commands, but the standard default settings are fine for most.
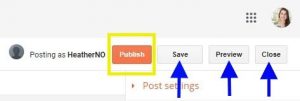
Step 5: Preview & Publish
- When your content is complete, and you are finished customizing your settings, you may wish to see what your finished Blog looks like with the Preview button, or you may wish to Save as a draft and Close to finish another time. When you are satisfied with your content, click Publish (your URL will now be shareable and viewable!)
- Once posted you may be able to stop here, depending on your Blog assignment parameters–but you may wish to continue on for more customization and style options.
Customizing Your Look & Feel
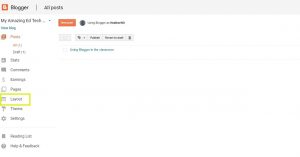
Step 6: Controlling your Layout
- Now that your Blog is published, you may wish to control how people view and interact with your page. You choose a Theme in the beginning, but there are other viewing options you can control in the Layout page:
- Within the Layout screen, you will see a variety of basic Blogger page sections, and tools, which will always include: your Header, Featured Post, Blog Posts, Popular Posts and a Footer. On the left-hand side of each Page Body Feature, there is an eye icon. If it has a slash through it, it means this page page is not visible–no slash means this element is visible on your published Blog.
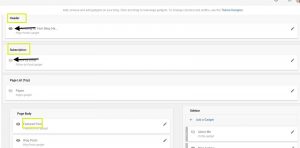
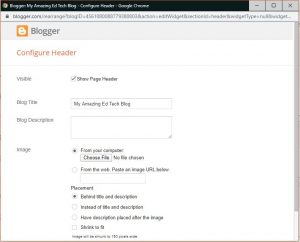
- On the right-hand side of each element is a pencil icon. You can click into each of this to control the visibility, as well as make any editing, color and style changes that relate to the element (see this example of the “Heading” options):
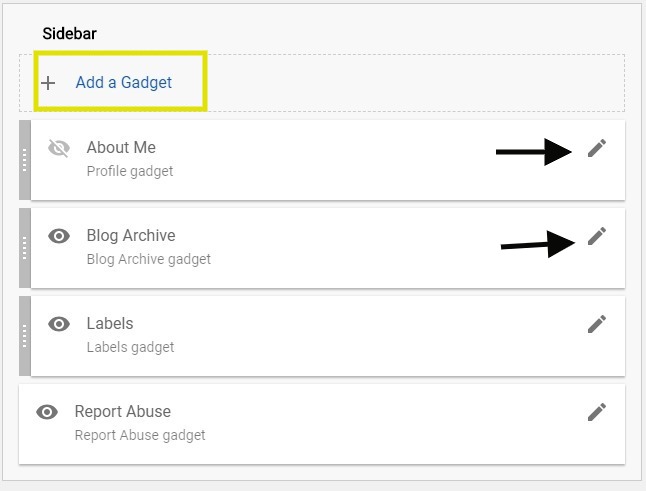
- You will also note that there may be a variety of Sidebar Gadgets. Gadgets are simply extra tools that may add value to your readers experience. You can add tools to link to About Me content, link to your Labels (or tags), or you can Add a Gadget that compliments your Blog theme or purpose. You can click the pencil on each Gadget to edit how it behaves, and control its visibility.
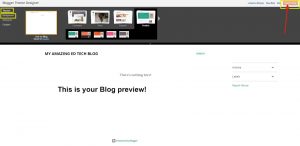
- To change the background color, click into the Theme Designer link:

- The Blogger Theme Designer view allows you to quickly review the look of you Blog, and change Themes or Background colors. Be sure to select easy to read fonts and high-contrast colors. You should also avoid busy patterns in your background, as it makes it hard for your reader to read your content. Don’t forget to Apply to Blog when you have found the settings that you like!
Happy Writing!
Need a printable copy of this resource?