Brightspace FAQs
On this page, you can search frequently asked questions about Brightspace. To open the answer to your question, simply click on the question text or the “+” in the top right corner of the accordion.
How can I adjust the dates for when my course opens?
Your new semester’s classes have been created, and they are active and set to start on the first day of classes–but perhaps you are interested in opening your class earlier for students, to acclimatize to your course structure or expectations. You can adjust the opening date to reflect that practice, following a couple of easy steps:
- On the UMPI Home Page, where you see your course tiles, in the desired course, hover in the top right corner until you see 3-dots appear:
- Click on those 3 dots and select Course Offering Information from the menu:
- This will take you to the Course Offering Information page within the course itself (also accessible in the Course Admin panel). From here you will scroll down to the Start Date section. You can update the date and time that the course opens from here–as long as the course is ‘Active’, it will open for access when this date is set. Note: if the box is ‘unchecked’ with no start date, the course will be accessible right away:
Note: do not uncheck the active box, as this will look to the student as if their course has disappeared (or that they are no longer enrolled). If you have any questions about how your start dates appear to students, please give CTL a call.
How do I send my announcements to student emails?
Brightspace allows users to opt-out of receiving emails. If you want your student to receive an email when you make an announcement you will need to prompt them to select to receive emails on announcements in their Notifications in their Mini-Bar. If they do not select to receive announcement emails they will not see them until they either log in to Brightspace, where they will be alerted of messages with an orange dot above the Notification bell, which (when clicked), will open access to Announcements across all of their classes–or enter your class, to view your announcement on your course home.
Where should I grade student work?
You have several options for where to grade student work.
1. Quick Eval (recommended)
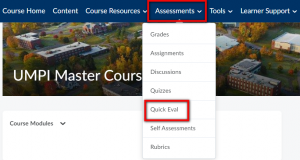
- Quick Eval offers instructors a single location to view all learner submissions that are awaiting evaluation. Submissions made to Assignments, Quizzes, and Discussions are displayed in a sortable list and can be selected to take you directly to their assessment page.
- Instructors can sort, filter, and search submissions to prioritize their evaluation work. Sorting can be done using the first or last name of the learner, Activity Name, Course Name, and Submission date. Filtering can be done using one or more of the following categories: Activity Name, Course Name, and Submission Date
- When accessing Quick Eval from a specific course, the list of activities to evaluate is prefiltered to only show items from that course.
- Note: When accessing Quick Eval from the UMPI home page NavBar will allow you to view submissions from all available courses.
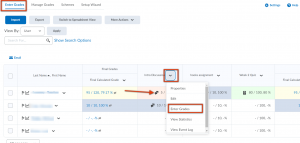
2. The Grades Tool
- The Grades tool for grade entry to a good tool to record grades for assessments that you observed, were handed in, in person, or to adjust for revisions. The Enter Grades panel in the Grades tool allows instructors to see, enter, and modify the grades for students in the course in one of two ways:
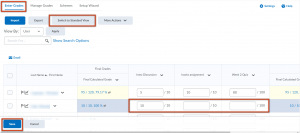
- In Standard view, by grade item. You can click on the assessment icon individually, or open the assessment panel for that item to grade multiple or all students at one time.
- In Spreadsheet view, which enables modification of grades for all students and all assignments on one page; however, this view will not allow for text-based feedback.
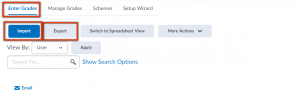
- Or, by synching your grade book using the import via CSV, you can export your grade book, manipulate grade data in Excel and import back into the grades tool, to synch
- In Standard view, by grade item. You can click on the assessment icon individually, or open the assessment panel for that item to grade multiple or all students at one time.
3. In the Assessment Tool (ie: Assignments, Discussions, Quizzes)
- Your grade book synchronizes automatically with the published scores and feedback that you enter in the grading panels in the Assignments, Discussions, and Quizzes tool pages (Note, in the Quizzes tool you have to enable grades to automatically synch with the Grades page). All scores, text-based feedback, and rubric information (if using) within these Assessment tools will be available for students to access and view in their Grades page.
- Any scores and feedback that you retract from publication are removed from the grade book automatically.
- Scores and feedback that you enter and keep as drafts do not synchronize back to Grades until they are published.
Should I build my course from scratch or course copy?
Many times, faculty want to know how to get started building a new course. You can build a new course by copying in content from a previous course and then reorganizing/revising that content to fit the new semester. However, in other cases, you might want to (or need to) build all the content from scratch–in many cases, a blended approach is appropriate.
The route you choose will depend on your circumstances and personal preference.
- If you have a lot of simple or text-based content or have spent a lot of time on content and structure creation, you may be better served using the course copy feature. Once you have copied a course or elements from another course you can reorganize/revise the content to fit the new semester.
- For courses that have become overcrowded over time, you may wish to completely rewrite the course, using a blended method. In this case, you may wish to rebuild your structure from scratch, and copy in just the components you need for the new semester, from an old class, and reorganize the imported content into your new course structure.
What is a grade scheme? Do I need one?
A grade scheme allows you to align user performance on grade items to levels of achievement. The Brightspace Default scheme is a percentage scheme, if you grade on via percentages or on a 100-point scale, that may fit your needs. A custom grade scheme can include any number of achievement levels. Each achievement level has its own range of acceptable grades and a symbol, such as a numeric value, letter, or text description, to represent it. The default Grade scheme in Brightspace is Percentage. You can create your own grade schemes if you need to.
| Grade Scheme | Grade Scheme Symbol (or what displays) |
| Letter | F, -C, C, C+, B-, B, B+, A-, A, A+ |
| Numeric | 1, 2, 3, 4 |
| Text | Approaching Proficiency, Proficient, Exceeds Proficiency |
It is important to note, that regardless of your custom Grade Scheme type, it will have to map back to a 100-point percentage scale to properly calculate grades–for example, in the custom Proficiency Scale below, you can see that each level (or Grade Scheme Symbol) maps back to a percentage range:
Why are my Kaltura links from my migrated class broken? How do I fix broken links?
When courses are migrated over from Blackboard the links to Kaltura videos are broken. This is because of how Blackboard hosts Kaltura content. You will need to replace those broken links with new ones in Brightspace. Don’t worry, your videos will all still be there in your MyMedia account.
Note: Once you have linked your Kaltura Account you will not have to link it again.
Hint: It is recommended that you link your Kaltura Account to Brightspace prior to deleting the broken links so that you can reference back to which videos need to be replaced.
Make sure your Kaltura is linked to Brightspace. To do this you need to select MyMedia under Tools on the Nav Bar. This will give Brightspace permission to access your Kaltura Videos. You will now be able to upload your Kaltura videos into your course content areas.
When I create a quiz, I see reference to a Question Library--what is that, and do I need to use it?
The Question Library is a central repository that stores and archives questions which you can reuse within a course. You can create multiple collections within the Question Library to organize your questions by type and topic, making it easier for you to find questions for your quizzes, surveys, and self-assessments.
As a best practice for storage, organization, and easy access, you can create all your questions using the Question Library. You can also consolidate questions you have already created within the Quizzes, Surveys, and Self Assessments tools by importing them back into the Question Library. You can even transport Question Library questions to other courses, to support building across multiple sections, or to create introductorily or review quizzes across classes.
Can I track student attendance in Brightspace?
The short answer to this question is: yes–you can track student class attendance or attendance at specific events. You can even create different attendance schemes, to meet your instructional needs! Let’s look at how:
Why can't students see their quiz results?
You have the option, in Brightspace to set a student quiz settings to display just the way you would like (and even to create special views that are only available for limited times or after a certain date). To set your own ‘default’ view though, follow the quick steps below:
- Go to the quiz that you want to adjust the viewing options on:
-
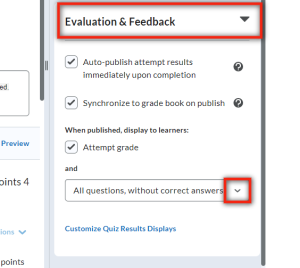
From the edit panel, go the Evaluation & Feedback panel, and open the ‘When published, display to learners‘ menu:
-
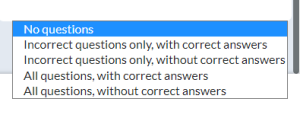
Select your viewing preferences (note that the default is to show all questions, without correct answers–which will show students all questions and points earned, but will not ID which questions students got wrong):
-
Don’t forget to save:
What are my options for test proctoring online?
Respondus Tools for Online Proctoring
Respondus LockDown Browser and Respondus Monitor are two tools new to UMS to increase the fidelity of online assessments. Faculty may use the LockDown Browser alone or in conjunction with Respondus Monitor.
Respondus LockDown Browser:
- Prevents students from printing, copying content, copy-paste, or screen capture while taking an assessment requiring LockDown.
- Prevents students from accessing other applications while using the LockDown browser, such as class notes, the internet, email, instant messaging (access to specific resources can be delegated by the instructor).
- Is integrated with the Brightspace Quizzes feature.
- Requires students to install the browser on their own devices (this download and install should only have to be done once). Can be used on Windows, Mac and iPad devices. (Note: this tool is not compatible on Chromebooks, Android phones, or iPhones)
Respondus Monitor:
- Utilizes the student’s webcam to records the student while taking the online exam.
- Can require photo ID, facial recognition, environmental scan among other credentials, configured by the faculty.
- Recordings are analyzed for irregular behavior, flagged, and presented back to the faculty for review.
A note about accessibility:
Respondus is a robust tool for preventing online cheating, but it has known issues with accessibility for your students. If you have any students with an accommodation request in your course and you are planning to use Respondus, please contact Disability Services to ensure your student’s accommodation requests are still being met.
Also keep in mind, if a student is allowed double the time due to accommodation, the faculty still sets a timed test with test exceptions for that student. Respondus honors it.
Getting Started
- Generate your tests in LMS (Brightspace)- all the features of your LMS test carry over to the Respondus LockDown Browser and Monitor
- Set up the Respondus Lockdown Browser and Monitor on Your Test, Quiz or Exam
- Provide instructions for your students
- Provide alternatives for your students
- Evaluate your videos generated by the Respondus Monitor
- Do a practice quiz in your class
IT’s Guide to Respondus has additional instructions for students, and example syllabus language.
Have a question not covered here? Search their database for specific use cases.
What about unprotected assessments in your course?
Curious about other assessment possibilities? UMaine’s CITL has developed a wonderful list of strategies that you can employ to design assessments that will not require proctoring your students. These strategies are also worth exploring to find out the best match for your course.
Can I sync a Brightspace Calendar to my Google Calendar?
Answer: yes
Use iCal feeds to access your Calendar events outside of the learning tool. With iCal feeds, you can view your course events in external calendars such as Microsoft Outlook and Google Calendar, and on mobile devices such as iPhones, BlackBerry smartphones, and Android phones.
Subscribing to an iCal feed syncs your external calendar application or device with the Calendar tool, keeping you updated without logging in to Brightspace Learning Environment. Refer to your device or application instructions for adding an iCal feed, as each application can have a different method for managing iCal feeds. 
- From within a Brightspace course, on the top blue NavBar, click Course Admin, and choose Calendar from the available resources.
- In the Calendar views area, click Settings and ensure that Enable Calendar Feeds is checked. Click “Save”.
- In the Calendar views area, click the Subscribe option (star icon).
- From the drop-down list, select which calendar(s) you want to subscribe to or select All Calendars and Tasks, or Tasks Only:
- This will create a custom calendar feed link for you to download. Keep this download handy for the Import step. Don’t forget to ‘close’.
To import into Google, click the “+” next to the Other Calendars list, this opens a menu, where you will select “Import”. This allows you to upload the Calendar feed that you previously downloaded from Brightspace.
Congratulations! You have successfully synced your Brightspace and Google Calendars!
Does Brightspace have a plagiarism checker?
- From the “Edit” panel of an assignment, click Turnitin:
2. From within that panel, you will click to enable, and choose whether to allow students to see the plagiarism report, as well as choose any any advanced options that may fill your instructional need:3. After you enable Turnitin for an Assignment, you can easily identify which assignments have the plagiarism checker, by the binocular icon in the Assignment list:For help interpreting the similarity score, please see Turnitin’s help pagesFor help troubleshooting Turnitin in Brightspace, please see Brightspace’s Assignments and Turitin Help page
I recorded my Zoom lecture in Kaltura and added it to Brightspace, but it is broken, why?
How can I view a course as a student, and take assessments?
The ~Preview ~Learner account exists in all courses and is individual for every instructor. They can be used to test out your course as a student.
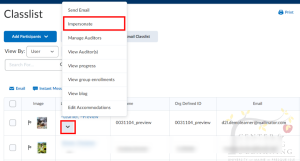
- Go to the Course Resources menu and select Classlist.
- Click the Action Button next to “Learner, Preview” and select Impersonate.
- Go to any area of the course that you would like to preview. Note, that you will not be able to see content that has been hidden due to release conditions or date.
To exit Learner Preview mode, click the orange profile badge in the upper right corner of the page and click the X next to Impersonating: Preview Learner.
How can I add action-oriented Hyperlinks to course areas?
You can add links anywhere in your course, where you can access the Editor ribbon (including in content pages, module descriptions, Announcements and in Feedback) using the Quicklinks button in the Brightspace Editor:
- Type some text, such as “Join the Discussion.”
- Highlight the text you want to be a clickable hyperlink.
- Click the Quicklinks button on the Brightspace Editor toolbar.
- A pop-up with a list of options will appear. Select what you would like to link to from the list (descriptions are below)
- Depending on what you chose, there may be an additional step, such as selecting the thing in your course to link to or entering a website address.
- The highlighted text will now be a clickable hyperlink. When students click it, they will be taken directly to whatever you designated in the previous steps.
Note: These types of in-course hyperlinks will not break after the course is copied as they did in Blackboard.
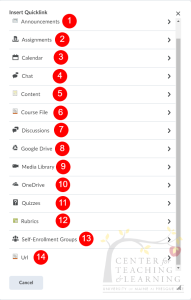
- Link to current or past announcements
- Link directly to Assignments (this works well for email Announcements!)
- Link to Calendar events and save-the-dates
- Link to Class chat spaces for small groups or office hours
- Link to specific content pages in your weekly or unit modules
- Link to documents (like Syllabi, etc) in your Course Files
- Link directly to Discussion topics
- Link to items in your Google Drive (remember to update sharing permissions)
- Link to videos in your VideoNote or AudioNote Library
- Link to items in your OneDrive
- Link to graded or ungraded Quizzes
- Link to Rubrics, to allow students to preview expectations for upcoming assessments
- If you enabled student self-selection groups, you can link to those group choices here
- Link to an extern Web URL (and open in a new window, for ease of student navigation).
Is there a way to print my Quiz Questions?
This ability is not built into Brightspace and requires the following workaround:
- Ensure your quiz is set to show all the questions on a single page: In the Quiz Tool (Assessments > Quizzes), click the down arrow next to the quiz and choose Edit. The “Questions per page” field should be empty.
- Click Save and Close, click the down arrow next to the quiz again, and choose Preview.
- Tick the box next to Bypass Restrictions.
- Click Start Quiz!.
- Use the “Control + A” to copy all questions and answers, followed by “Control + C” to copy. Paste the questions into Word or a Google Doc using the “Control + V” function.